It happens to the best of us. The dinner party is going beautifully, the candles are doing their atmospheric best, and then – one knocked elbow, one overenthusiastic gesture, one small moment of domestic chaos – and suddenly there’s a spreading pool of molten wax making itself very much at home in your wool carpet. The good news? You don’t need a blowtorch, a heat gun, or any equipment that would raise eyebrows at airport security. You don’t even need to ring anyone in a panic. What you do need is the right method, a bit of patience, and a clear understanding that wool is not like other carpets. Treat it correctly and it will forgive you entirely. Treat it like a synthetic and you’ll be having a very different kind of dinner party conversation next time round.
Why Wool Carpets Demand a Gentler Approach Than You Might Think
Wool is, in many ways, the aristocrat of carpet fibres. Naturally resilient, beautifully textured, and possessed of an ability to age gracefully that nylon simply cannot imitate. But that same natural composition makes it considerably more sensitive to aggressive cleaning methods than its synthetic counterparts.
The key issue is that wool is a protein fibre – much like human hair – and it responds to heat, harsh chemicals, and excessive moisture in ways that can be permanent. Apply too much heat and the fibres can scorch or felt, that unpleasant matting where the pile fuses together irreversibly. Use the wrong solvent and you risk stripping the natural lanolin oils that give wool its characteristic softness and resilience. Over-wet it and you’re looking at potential shrinkage, pile distortion, or the dreaded “browning” – a yellowish discolouration caused when natural fibres stay damp too long.
Polyester and nylon carpets can absorb considerably more punishment before showing damage. Wool cannot, and knowing that going in is genuinely half the battle.
Before You Do Anything – Let the Wax Harden
The Hardening Rule (And Why Impatience Makes It Worse)
This is the instruction that feels most wrong in the moment, but trust it completely: do not touch the wax while it is still warm.
Every instinct will tell you to grab a cloth and start blotting immediately. Resist that instinct firmly. Warm, molten wax is in its most mobile state – it will spread laterally across the carpet surface, push deeper into the fibre structure, and bond far more aggressively as it cools. Touching it now is precisely how a small spill becomes a large and deeply embedded one.
Instead, leave it entirely alone for at least 30 to 45 minutes. If you want to speed up the hardening process, place an ice pack or a sealed bag of frozen peas over the wax – never directly on the carpet pile, always in a sealed, dry bag to prevent any moisture transfer. Once the wax is completely solid and cold to the touch, you are ready to begin.
What You’ll Need (No Specialist Equipment Required)
One of the genuinely reassuring things about this whole process is that you almost certainly have everything you need already sitting in your kitchen. No specialist products, no trips to a trade supplier, no waiting on next-day delivery.
Here is your kit list:
- A blunt butter knife or the edge of an old credit card
- Several clean, plain white cloths or white kitchen roll
- Baking parchment or plain brown paper bags, opened flat
- A cool iron
- A small amount of washing-up liquid
- Cold water
- Optionally, a proprietary dry-cleaning solvent for any residual dye staining
A quick word on what not to reach for: acetone-based nail varnish remover, white spirit, any coloured cloths that might transfer dye onto damp fibres, and – it very much bears repeating – anything that produces steam. Keep your materials simple and you will keep yourself out of trouble.
The Step-by-Step Method for Lifting Wax from Wool
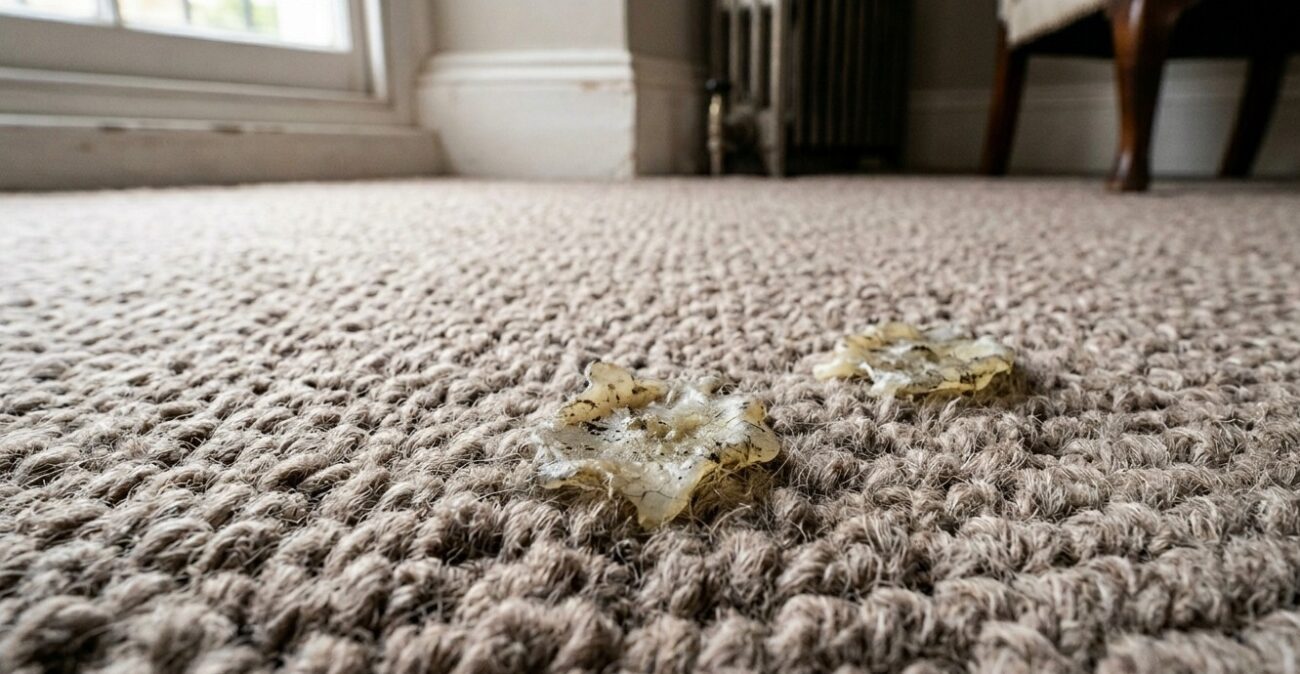
Step 1 – Mechanical Removal (The Scrape)
With the wax fully hardened, begin by breaking up and lifting as much of the solid material as possible before applying any heat whatsoever. Hold your blunt knife or credit card at a shallow angle – roughly 30 degrees to the carpet surface – and work from the outer edges of the spill inward. That direction is important: scraping outward pushes debris further into clean fibres, whilst working inward keeps everything contained within the existing footprint of the spill.
Use short, controlled lifting strokes rather than long dragging motions. The goal is to fracture the hardened wax and lift the pieces cleanly away from the pile, not grind them deeper in. Collect the flakes immediately – a strip of sticky tape works brilliantly for picking up smaller fragments – so they cannot re-embed under foot traffic.
You will likely clear 60 to 70 per cent of the wax in this stage alone, which is a satisfying start.
Step 2 – The Cool Iron and Paper Method (Drawing Out the Residue)
This is where the real work happens, and also where most DIY attempts go wrong – not in the technique itself, but in the temperature. The iron must be on its absolute coolest setting. Not “low.” Coolest. On most irons, that means sitting below even the synthetic fabric symbol, right at the very bottom of the dial.
Place a sheet of baking parchment – or a plain, unprinted brown paper bag opened flat – directly over the remaining wax residue. Press the cool iron onto the paper for no more than five to ten seconds at a time, then lift it completely. Do not slide it across the surface. Do not leave it sitting static. Brief, gentle contact only.
What you are doing is softening the residual wax just enough for it to transfer upward into the paper rather than driving it deeper into the pile. Move to a completely fresh section of paper after each press – returning to the same spot will simply re-deposit the wax you have just lifted, which is deeply counterproductive.
Repeat this process patiently, always moving to clean paper, until nothing more transfers. It takes a little time, but the results are genuinely impressive.
Step 3 – Treating the Colour Stain (If One Remains)
If your candle was white or cream, you may well find the carpet looks perfectly clean at this stage. If, however, you were burning one of those richly coloured pillar candles – the deep burgundy ones that look magnificent on a dining table right up until they cause a domestic incident – there is a reasonable chance the wax is gone but the dye has left a shadow behind.
For this, mix a small amount of washing-up liquid with cold water to create a mild, lightly sudsy solution. Apply it to a clean white cloth – never pour liquid directly onto the carpet – and work it gently into the stain using a blotting and dabbing motion. No rubbing whatsoever. Rubbing distorts the pile structure and spreads the stain further into surrounding fibres.
Follow with a cold, clean water rinse applied in exactly the same way, then blot firmly with a dry white cloth to remove as much moisture as possible. For stubborn pigment that refuses to shift, a small amount of dry-cleaning solvent applied to a cloth – again, not poured directly onto the carpet – can be very effective. Always test it on a hidden corner of the carpet first, particularly with older or hand-dyed wool.
Step 4 – Drying and Restoring the Pile
Wool must dry slowly and naturally. No hairdryers, no positioning the rug directly beside a radiator, no pointing a fan at the damp patch on full power. These approaches accelerate surface drying whilst leaving moisture trapped at the base of the pile – precisely the condition that leads to browning and, in persistent cases, a mildew odour that is extremely stubborn to eliminate afterwards.
Instead, lay a clean dry white towel over the treated area and press it down gently. Leave it for an hour, then replace it with a fresh dry towel if the first has absorbed significant moisture. Once the carpet is completely dry – and do check properly by pressing your palm firmly into the pile at the centre of the treated area – restore any flattened or disturbed fibres by brushing lightly with a soft-bristled brush or the back of a spoon, always following the natural direction of the pile.
Five Common Mistakes That Turn a Minor Spill into a Major Problem
Even with the best intentions, it is surprisingly easy to make a wax spill worse rather than better. These are the five errors that come up most frequently.
Touching the wax whilst it is still warm. As covered above – resist. The damage done in those first impulsive thirty seconds can take hours to undo.
Using a hot iron. The most common mistake by a considerable distance. High heat does not simply melt wax away from the surface; on wool, it can cause permanent scorching or felting that no amount of subsequent cleaning will reverse.
Rubbing instead of blotting. Rubbing spreads staining outward, distorts the pile, and forces pigment deeper into the fibre. Always blot, always.
Reaching for nail varnish remover. Acetone does dissolve wax readily – and it strips the colour from wool fibres with equal enthusiasm and zero discrimination. Keep it away from the carpet entirely.
Over-wetting the pile. More moisture is not more effective. Wool that remains damp for extended periods browns, distorts at the base, and in the worst cases develops an odour that is remarkably difficult to shift completely.
When the DIY Method Isn’t Enough – And That’s Okay
The method above handles the vast majority of candle wax incidents on wool carpets thoroughly and safely. There are circumstances, however, where even careful home treatment will not get you all the way there.
Large spills spread across a significant surface area are considerably harder to treat evenly without specialist equipment. Antique or hand-knotted wool rugs deserve particular caution, as their dyes and construction can respond unpredictably to even gentle home cleaning. Wax that has been trodden deeply into the pile before hardening, or that has already endured a well-meaning but misguided first pass with a steam cleaner, can become embedded in ways that require professional extraction to address properly.
Dye staining from highly pigmented candles – particularly reds, dark blues, and vivid greens – can also set faster than expected, and once set, it responds considerably better to professional-grade treatments than to anything available across a kitchen counter.
Recognising the limits of what is achievable at home is not an admission of failure. It is simply good sense – and it tends to save a great deal of additional grief further down the line.